C++标准库
一些标准库的使用方法
ofstream
#include<fstream>
ofstream temp(Filepath.txt);
temp<<………;
temp.close();
精度设置
std::ofstream(const char* filepath);
// 不适用科学计数法表示
ofs<<std::fixed
// 有效数字位数
ofs.precision(int num);
// 当输出一行数字的精度不同时, 每次修改精度前单独设置一次
ofs<<num<<"\t";
ofs.precision(5);
ofs<<iter.incidence<<"\t";
ofs.precision(2);
ofs<<iter.row<<"\t"<<iter.col<<"\t";
ofs.precision(5);
ofs<<iter.point.x<<"\t"<<iter.point.y<<"\t"<<iter.point.z<<"\n";
// ...
ofs.close();
占位符 & 输出位置
ofs<<std::right;
    ofs<<std::setw(4)<<1<<std::setw(4)<<10<<std::setw(4)<<100<<std::endl;
    ofs.close();

/// 输出结果格式如下
/// “___1__10_100”(将空格替换为下划线方便查看间距)
ifstream
ifstream ifs;
ifs.open(txtsrc);
if (!ifs.is_open()){
    return false;
}

string str;
string Separator = string(",");
while (getline(ifs, str))
{
    /// str...
}
ifs.close();
二进制文件读取及跳字节
场景:2022.3.17 其他软件无法正常显示.dat
std::ifstream ifs("filepath",ifsteam::binary);
if(!ifs.is_open()){
    return false;
}
double value;
while(ifs.read((char*)value,sizeof(double)/*8*/))
{
    //如果value异常 (error只是一个假想的函数)
    if(error(value)){
        //ifs指针从当前位置(ios::cur)向前跳n-1的字节,
        ifs.seekg(1-sizeof(double),ios::cur);
        continue;
    }
}
std::ifstream ifs("filepath",ifsteam::binary),用二进制方式读取文件。
ifs.read(char_type* ,streamsize ),每次读取streamsize长度的字节数,并存储到指定位置(char_type*)。
seekg:
ifs.seekg(off_type,ios_base::seekDir) ifs的当前指针移动到seekDir处并偏移off_type字节。
ios_base::seekDir:
ios::beg 表示输入流的开始位置
ios::cur 表示输入流的当前位置
ios::end 表示输入流的结束位置
filesystem
c++17, 类似于QFileInfo
#include <filesystem>
namespace fs = std::filesystem;
std::string root_path;
fs::path fs_path(root_path);
bool ans;
std::string str_path = fs_path.string(); //路径转字符串
ans = fs_path.is_directory();  //文件夹
ans = fs_path.is_regular_file();   //文件
fs::path fs_parentpath = fs_path.parent_path(); //文件的路径

fs::path filename = fs_path.filename(); //文件名
fs::path extension = fs_path.extension(); //拓展名(后缀)

for (auto& iter : directory_iterator(root_path)){
    //查看当前路径下的所有文件/文件夹
}

for (auto& iter : recursive_directory_iterator(root_path)){
    //迭代查看当前路径及子文件内的所有文件/文件夹
}
chrono
计时功能
auto start = std::chrono::system_clock::now();
func();/// 一个费时的函数
auto end = std::chrono::system_clock::now();
auto duration = std::chrono::duration_cast<std::chrono::microseconds>(end - start);
cout <<  "Spent" << double(duration.count()) * std::chrono::microseconds::period::num / std::chrono::microseconds::period::den << " seconds." << endl;
C++11的 #include<chrono> 通过模板调整精度可以达到微妙级,相比传统的#include <ctime> 精度更高。
chrono::time_point -> string
auto tp = std::chrono::system_clock::now(); // time_point
time_t time = std::chrono::system_clock::to_time_t(tp);
std::stringstream ss;
ss << std::put_time(std::localtime(&time), "%Y-%m-%d %H:%M:%S");
std::string str = ss.str();
首先通过to_time_t将time_point转换为time_t,然后使用std::localtime()将time_t转换为tm,再使用put_time()将tm转换为指定输出格式的_TimeObj,存储到stringstream中,最后通过stringstream::str()转换为string。
如果使用tm存储时间数据,则可以直接使用put_time将时间转换为字符串。
put_time & get_time
按照指定格式输出和获取时间
put_time的链接中包含了支持的各种格式说明,同样适用于get_time
例如:
| 说明符 | 替换 | 示例 |
|---|---|---|
| %y | 年份,最后两位数字(00-99) | 01 |
| %Y | 年份,四位数字 | 2001 |
| %m | 月份的十进制数(01-12) | 08 |
| %M | 分钟(00-59) | 56 |
| %d | 月份中的某一天,用零填充(01-31) | 23 |
| %D | MM/DD/YY日期的简写,相当于%m/%d/%y | 08/23/19 |
| %F | YYYY-MM-DD日期的简写,相当于%Y-%m-%d | 2023-04-14 |
| ... | ... | ... |
示例:
std::tm t = {};
std::istringstream ss("2011-Februar-18 23:12:34");
ss.imbue(std::locale("de_DE.utf-8"));
ss >> std::get_time(&t, "%Y-%b-%d %H:%M:%S");

if (ss.fail())
  std::cout << "Parse failed\n";
else
  std::cout << std::put_time(&t, "%c") << '\n';
copy from CMake Cookbook 3.7章节
// copy from CMake Cookbook 3.7章节
std::chrono::time_point<std::chrono::system_clock> start, end;
std::chrono::duration<double> elapsed_seconds;
std::time_t end_time;
start = std::chrono::system_clock::now();
// ...
end = std::chrono::system_clock::now();
// Report times
elapsed_seconds = end - start;
end_time = std::chrono::system_clock::to_time_t(end);
std::cout <<"matrices allocated and initialized"
          <<std::put_time(std::localtime(&end_time),"%a %b %d %Y %r\n")
          <<"elapsed time: "
          <<elapsed_seconds.count()<<"s\n";

// cmd打印内容
// matrices allocated and initialized Sun Jun 17 2018 11:04:20 AM
// elapsed time: 0.0492328s
popen
可调用cmd,并且获取cmd实时的(每一行)输出结果,代码与控制台的交互。
示例:
通过调用cmd,执行pip list命令,该命令是查看pip包管理工具中已安装的依赖库
char buffer[1024];
const char* szCmd = "pip";
FILE* pipe = _popen(szCmd, "r");
if (pipe != nullptr) {
    while (fgets(buffer, 1024, pipe) != NULL){
        std::cout << std::string(buffer);
    }
    fclose(pipe);
}
map
关联函数的三种方法
通过map容器,将枚举或字符串与函数(通过函数指针或std::function等方法)相关联, 可以实现在循环中根据枚举或字符串选择函数的功能。
普通的函数指针
适用于调用普通的函数
bool fun1(int){
    ///...
}
bool fun2(int){
    ///...
}

std::map<std::string, bool(*)(int)> funs_ = {
    {"fun1", func1},
    {"fun2", func2}
}

bool b = funs_["fun1"](10);
类函数指针
可以调用类里的函数
/// .h
class Cs
{
    /// ...
    void func1(const std::string&);
    void func2(const std::string&);

    /// 定义函数指针
    typedef void(Cs::*funcs_ptr)(const std::string&);
    std::map<std::string, funcs_ptr> funs = {
        {"func1",func1},
        {"func2",func2}
    };

    void work(std::string, const std::string&);
}

/// .cpp
void Cs::work(std::string func_name, const std::string& func_par)
{
    funs[func_name](func_par);
}
lambda函数
使用函数指针或fucntion都可以实现, 但实际写代码时发现使用函数指针搭配lambda函数, 如果lambda函数的“捕获列表”不为空时会有报错提醒,但使用function则不会出现报错提示,所以更建议使用map + function + lambda的组合方式。
应用场景, 读取json文件时, 不同的对象可能是不同的类型, 如果每次读取对象都要写几行代码, 不省时省力, 还很难拓展, 使用map+lambda函数解决该问题。
/// .h
enum class para_type{string, number};
/// tuple<bool, std::string> bool记录函数的处理结果, string记录错误(或成功)信息
using tuple_bs = std::tuple<bool, std::string>;
class read_json
{
    ///...
    std::map<para_type, std::function<tuple_bs(nlohmann::ordered_json, const std::string&)>> para_check =
    {
        {para_type::string, [](nlohmann::ordered_json json_pars, const std::string& name) {
            nlohmann::ordered_json json_par = json_pars[name];
            if (json_par.is_null() || !json_par.is_string())
                return std::make_tuple(false, fmt::format("\"{}\" is null or isn't string;", name));
            return std::make_tuple(true, fmt::format("\"{}\" is qualified;", name));
        }},
        {para_type::number, [](nlohmann::ordered_json json_pars, const std::string& name) {
            nlohmann::ordered_json json_par = json_pars[name];
            if (json_par.is_null() || !json_par.is_number())
                return std::make_tuple(false, fmt::format("\"{}\" is null or isn't number;", name));
            return std::make_tuple(true, fmt::format("\"{}\" is qualified;", name));
        }},
    };
}

/// .cpp

tuple_bs rst;
bool no_error_par = true;
/// 定义好所有变量名以及其对应的para_type
std::map<para_type, std::string> pars_info ={
    {para_type::string, "xml_filepath"},
    {para_type::number, "threshold"}
};
for(auto it = pars_info.begin(); it != pars_info.end(); it++){
    rst = para_check[it->first](json_pars, it->second);
    /// 如果返回值为true, 则无需错误信息
    if (!std::get<0>(rst))
        pars_err_info += std::get<1>(rst);
    /// 将每个参数返回的bool值与之前所有的bool值进行'&&'与运算, 当出现一个false时,最终结果为false
    no_error_par = no_error_par && std::get<0>(rst);
}
/// 如果no_error_par为false, 说明有参数的检测结果为false, 否则说明全部参数都通过检测
if (!no_error_par) {
    return std::make_tuple(false, pars_err_info);
}

return std::make_tuple(true, "inheritance read(ldsarXml_to_sbJson::read) success.");
该方法在类中写函数, 使用map+函数指针的方式同样可以实现。
regex
regex使用的正则表达式语言是ECMAScript
常用语法
[]: 字符集,可存放多个字符{}: 计数,表示字符/字符集次数(): 子模式,改变优先级,对一块区域整体性操作^:起始字符;若在[]中则表示否定$:终止字符\|:或
字符集:
.: 任意一个单字符\d: 一个十进制数字\l: 一个小写字母\s: 一个空白符(空格、制表符等)\u: 一个大写字母\w: 一个字母(a-zA-Z)或数字(0~9)或下划线(_)\D: 除了\d之外的其他字符\L: 除了\l之外的其他字符\S: 除了\s之外的其他字符\U: 除了\u之外的其他字符\W: 除了\w之外的其他字符[abc]表示字符串包含"a"、"b"、"c"任意一项[a-z]表示字符串中包含a~z中的任意一项[a-zA-Z0-9]表示字符串中包含包含有大小写不限的字母和数字
计数(重复):
{n}字符/字符集严格重复n次{n,}字符/字符集至少重复n次{n,m}字符/字符集至少重复n次,最多重复m次*:{0,}不存在或存在任意次数均满足条件+:{1,}存在且只撒后出现1次满足条件?:{0,1}不存在或仅存在1次满足条件
子模式:
为了指定模式中的子模式,用括号将其括起来
(\d*:)?(\d+):它表示字符串前半部分可以为空,若非空,则是任意长度的数字后接一个冒号,后半部分是一个或多个数字的序列。
贪婪与非贪婪:
正则表达式默认是趋向于最大长度的匹配,即贪婪模式,对于字符串string("gitbook isn't a book")和匹配规则"git.*book",贪婪模式下得到的结果为"gitbook isn't a book";
而在计数符(量词)后直接加一个问号?,即为非贪婪模式。git.*?book,非贪婪模式下得到的结果为"gitbook"
常用指令
- 整数
"^[-|+]?[0-9]+$" - 非负整数
"^\\d+$" - 浮点数
c"^(-?\\d+)(\\.\\d+)?$" - 英文字母字符串
"^[A-Za-z]+$" - 年-月-日
"^(d{2}|d{4})-((0([1-9]{1}))|(1[0-2]))-(([0-2]([1-9]{1}))|(3[0|1]))$"
代码示例
函数判断是否为string是否为数字:
bool isnum(std::string str)
{
    bool bInt, bFloat;
    std::regex reg_integer("^[-|+]?\\d*$");
    std::regex reg_float("^[-|+]?\\d+\\.\\d*$");
    std::smatch results;

    //bInt = std::regex_match(str, reg_integer);
    bInt = std::regex_search(str, results, reg_integer);
    if (bInt)
        return bInt;
    //bFloat = std::regex_match(str, reg_float);
    bFloat = std::regex_search(str, results, reg_float);
    return bFloat;
}
代码中results为返回的匹配的字符串,但未使用。
std::regex_search(seq, m, r, mft)函数中,
seq可以是一个string、一个表示范围的一对迭代器以及一个指向空字符结尾的字符数组的指针;
m是一个macth对象,用来保存匹配结果的相关细节。m和seq必须具有兼容的类型;
(smatch表示string类型的输入序列,cmatch表示字符数组序列,wsmatch表示宽字符串(wstring)输入,wcmatch表示款字符数组)
r是一个正则表达式;
mft是一个可选的regex_constants::match_flag_type值,详见C++Primer(第5版)659页�。
terminal(cmd) color
windows, linux控制台打印彩色文字
windows

输出颜色表的代码
#include <windows.h>
#include <iostream>

std::cout<<std::right;
for(int i=0; i<16; i++){
    for(int j=0; j<16; j++){
        int value = i * 16 + j;
        SetConsoleTextAttribute(GetStdHandle(STD_OUTPUT_HANDLE),value);
        std::cout<<setw(5)<<value;
    }
    std::cout<<std::endl;
}
设置SetConsoleTextAttribute后,会影响所有的打印内容,如果要切回初始效果,只能选一个近似的值�设置。黑底白字没有加量应该是SetConsoleTextAttribute(GetStdHandle(STD_OUTPUT_HANDLE),7);
windows.h与glog冲突,需要进行设置:
#define GLOG_NO_ABBREVIATED_SEVERITIES
#include <windows.h>
#include <glog/logging.h>
linux
linux中就简单很多,不需要添加库,iostream即可
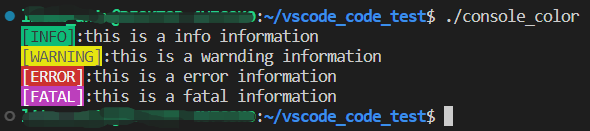
std::cout<<"\033[42m[INFO]\033[0m:"<<"this is a info information"<<std::endl;
std::cout<<"\033[43m[WARNING]\033[0m:"<<"this is a warnding information"<<std::endl;
std::cout<<"\033[41m[ERROR]\033[0m:"<<"this is a error information"<<std::endl;
std::cout<<"\033[45m[FATAL]\033[0m:"<<"this is a fatal information"<<std::endl;
效果如图所示:
\033[?m是linux中的指令,其中?部分是可以修改的值。
常见的设置为:
\033[0m关闭所有属性\033[1m高亮\033[2m亮度减半\033[3m斜体\033[4m下划线\033[5m闪烁\033[6m快闪\033[7m反显\033[8m消隐\033[9m中间一道横线
10-19 关于字体的,21-29 基本与1-9正好相反
30-37 设置前景色
\033[30m黑\033[31m红\033[32m绿\033[33m黄\033[34m蓝\033[35m紫\033[36m深\033[37m白
40-47 设置背景色
\033[40m黑色背景\033[41m红色背景\033[42m绿色背景\033[43m棕色背景(黄)\033[44m蓝色背景\033[45m品红背景\033[46m孔雀蓝背景\033[47m白色背景
等等...后面还有很多但与颜色无关。
实用小函数
读取二进制float数据
bool slcRead(const char *src,float *fReal, float *fImag)
{
    ifstream inFile(src, ifstream::binary); //二进制读方式打开
    if (!inFile) {
        printf("ERROR: File open failed...\nFilepath is %s",string(src));
        return false;
    }
    bool bReal = true;
    int num = 0;
    unsigned int value2;
    while (inFile.read((char*)&value2, 4)) { //一直读到文件结束
        //高低位字节变换
        unsigned int idata1, idata2, idata3, idata4;
        idata1 = 255 & (value2 >> 24);
        idata2 = 255 & (value2 >> 16);
        idata3 = 255 & (value2 >> 8);
        idata4 = 255 & value2;
        char str[9];
        sprintf(str, "%02x%02x%02x%02x", idata4, idata3, idata2, idata1);
        str[8] = 0;
        float a;
        sscanf(str, "%x", &a);
        //分别存储到fReal和fImag中
        if (bReal) {
            fReal[num] = a;
            bReal = false;
            //printf("%d:real %f,\t", num2, a);
        }
        else {
            fImag[num] = a;
            bReal = true;
            num++;
            //printf("imag %f\n", a);
        }
    }
    return true;
}
根据指定标识符分割字符串
void strSplit_ver2(std::string input, std::vector<std::string>& output, std::string split, bool clearVector = true)
{
    if(clearVector)
        output.clear();
    std::string::size_type pos1, pos2;
    pos1 = input.find_first_not_of(split);
    pos2 = input.find(split,pos1);

    if (pos1 == std::string::npos) {
        return;
    }
    if (pos2 == std::string::npos) {
        output.push_back(input.substr(pos1));
        return;
    }
    output.push_back(input.substr(pos1, pos2 - pos1));
    strSplit_ver2(input.substr(pos2 + 1), output, split,false);

}
2的n次方检测方法
bool check_2n(uint x)
{
    if(x == 0)
        return false;
    int y = x&(x-1);
    if(y==0)
        return true;
    return false;
}
原理:
计算数组长度
动态数组:
size_t x = 20;
double * arr = new double [x];
std::cout<<_msize(arr)/sizeof(*arr)<<std::endl;
// cmd: 20
静态数组:
double arr[15];
std::cout<<sizeof(arr)/sizeof(*arr)<<std::endl;
// cmd: 15
检测数组为动态或静态的方法:
如果使用计算动态数组长度的方式计算静态数组会导致异常报错(_msize问题),而用计算静态数组长度的方式计算动态数组则会返回0(sizeof(arr_a) < sizeof(*arr_a), 返回整数0).