pybind11
![]()
使用CMake + Pybind11, 将C++写的算法/类,导出到Python中,类似于一个Python库/包
导入pybind11
- vcpkg
cd到vcpkg根目录下, 下载pybind11库
vcpkg install pybind11:x64-windows --clean-after-build
在CMakeLists.txt内添加如下字段
find_package(Python COMPONENTS Interpreter Development)
find_package(pybind11 CONFIG)
- sub_directory
pybind11是一个header-only库, 所以直接把它当做子项目加载到当前项目中也非常方便
从github下载pybind11到指定路径。
项目结构,如下所示
projects/
    pybind11/   <-- 从github上下载的pybind11项目
        docs/
        include/
        tools/
        ...
        setup.py
        CMakeLists.txt
    mylib.cpp
    CMakeLists.txt  <-- 项目根目录的CMakeLists.txt
在外侧CMakeLists.txt中添加如下字段
add_subdirectory(pybind11)
创建模板库
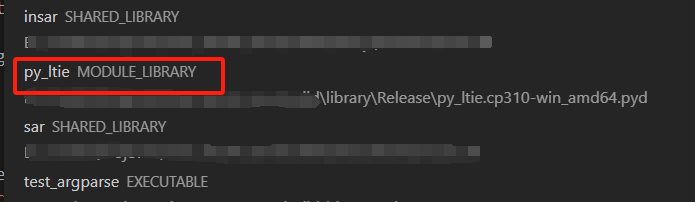
不同于C++中常见的可执行文件'executable', 动态库'shared library', 又或是静态库'static library', pybind11的目标在VSCode被标记为模板库'module library'。
在创建模板库时也不应该使用C++中常用的add_library, add_executable, 而是pybind11_add_module.
# CMakeLists.txt
pybind11_add_module(py_ltie
        your_libs.cpp)
target_link_libraries(py_ltie PUBLIC my_utils)
target_link_libraries(py_ltie PUBLIC my_algo)   # my_utils, my_algo 都是依赖库
target_link_libraries(py_ltie PRIVATE pybind11::lto pybind11::embed pybind11::module pybind11::headers)
执行一次CMake后, 该目标会显示在IDE(VSCode)中,
pybind"语法"
几乎所有语法都是写在PYBIND11_MODULE(name, varible)宏内。其中name名字应该与pybind11_add_module的第一个参数相同,varible则随意设置一个变量即可。
与上面CMake代码相对应的,
/// your_libs.cpp
#include <pybind11/pybind11.h>
namespace py = pybind11;

PYBIND11_MODULE(py_ltie, m) {
    /* 更多内容... */
}
your_libs.cpp 建议是一个独立的cpp文件, 它可以通过#include <...> 加载其他库里的类和函数, 而不需要在该文件中重新定义。
下面提到PYBIND11_MODULE的代码块, 都默认使用了#include <pybind11/pybind11.h>和namespace py = pybind11;, 也就不再赘述了
函数
大部分“蜻蜓点水”式介绍pybind11的文章/视频,都会提到。
实际上就是用了pybind官方文档的First steps #Creating bindings for a simple function的内容...
写一个函数, 就完事了。完整的代码示例如下:
/// your_libs.cpp
#include <pybind11/pybind11.h>

int add(int i, int j) {
    return i + j;
}

PYBIND11_MODULE(py_ltie, m) {
    m.doc() = "pybind11 example plugin"; // optional module docstring
    m.def("add", &add, "A function that adds two numbers");
}
在我还不太理解pybind11工作原理的时候,这么点示例完全不够我去举一反三的。我甚至一度以为要在自己的每个cpp下面都加一个PYBIND11_MODULE...
有一点需要注意:
      这里的py_lite ↓  应该与cmakelist.txt里的'py_lite'保持一致(否则会在import py_lite时提示动态模板没有初始化)
PYBIND11_MODULE(py_ltie, m) {    <-- 这里的m
  和这个m需要保持一致 --> m.def("add", &add, "A func...");
}
言归正传,普通函数的转换语法为:
PYBIND11_MODULE(py_ltie, m) {
    m.def("add", &add, "A function that adds two numbers");
}
第一个参数, "add"是在该函数在python中的名称;
第二个参数,&add是输入了该函数的地址
第三个参数,"A func..."是对该函数的解释说明(在pybind11-stubgen章节生成pyi文件后, IDE中就会显示该函数的解释说明)
类
面向对象是C++内常见的编程思路,所以自定义的类才是最需要提供python接口的... 但网上愿意翻译一下官方文档讲一下它的人愣是没几个...
前��提:
我之前写了一个小工具动态库my_utils.dll,并且该库已经通过target_link_libraries加载到py_lite模板库中。
其中在utils/datatype.h中我定义了一个结构体xyz用于存放空间直角坐标系数据, 形如
/// include/utils/datatype.h
class llh; /// longitude, latitude, height
class xyz
{
public:
    xyz();
    ~xyz();
    xyz(double X, double Y, double Z);
    double norm();
    xyz abs();
    xyz unit();
    xyz cross(xyz sec);
    xyz operator-(xyz sec);
    xyz operator+(xyz sec);
    double operator*(xyz sec);
    xyz operator*(double m);
    llh to_llh();
    llh to_llh(double major, double minor);
    void from_llh(llh lonlathei, double major, double minor);

public:
    double x, y, z;
};

/// src/utils/datatype.cpp

/* 存放相应的函数实现代码 */
转换语法
/// your_libs.cpp
#include <pybind11/pybind11.h>
namespace py = pybind11;
#include <utils/datatype.h> /// 这是我自己写的动态库, 在CMakeLists中已经通过`target_link_libraries`链接了

PYBIND11_MODULE(py_ltie, m) {
    py::class_<xyz>(m, "xyz")
        .def(py::init<>())
        .def(py::init<double, double, double>())
        .def_readwrite("x",&xyz::x)
        .def_readwrite("y",&xyz::y)
        .def_readwrite("z",&xyz::z)
        /*其他成员变量*/
        .def("norm",&xyz::norm)
        .def("abs",&xyz::abs)
        .def("unit",&xyz::unit)
        .def("cross",&xyz::cross);
}
1 py::class_<>()
py::class_<llh>(m, "xyz")是在python中创建一个llh类,其中第一个<xyz>是C++中的类,第二个"xyz"是该�类在python中的名称,即调用方法。在后面加.def, .def_readonly, .def_readwrite的行为,就是在python中为该类夹可以调用的成员函数、成员变量等内容...
2 构造函数
首先,构造函数是必须存在的。因为我在llh类中设置了两种构造函数,一种是不需要入参的xyz(),另一种是有三个入参的xyz(double, double, double),所以我需要写两个py::init(我也可以不写全,但没写的构造方法也就没办法在python中使用)。
.def(py::init<>())对应xyz(), .def(py::init<double, double, double>())对应xyz(double, double, double)。如果你的类里有其他的构造函数,依次类推...
3 共有成员变量
.def_readwrite("x",&xyz::x)可以为成员变量x提供有可读可写的接口。第一个"x"该成员函数在python中的名称,也是调用方法。第二个&xyz::x是它的地址。如果我们想设置只读类型的接口,可以把.def_readwrite(...)替换为.def_readonly(...)。
4 私有成员变量
对于私有变量(private:), 可以使用.def_property("name", &class::get, &class::set)定义
TODO: 没写完, 以后用到了再补充
5 成员函数
方法与成员变量类似。
以.def("norm",&xyz::norm)为例,该函数是计算坐标模长的函数。第一个"norm"是该成员变量在python中的名称,也是调用方法。第二个&xyz::norm是它的函数地址。
重载的成员函数
由于python并不支持函数重载,所以对于C++类里重载的成员函数,pybind11提供的方法是:py::overload_cast<double>(&class::func), 将重载函数定义不同的调用方法。
仍以类中提到的xyz为例,成员函数to_llh()存在重载情况,实现方法为,
/// your_libs.cpp
#include <pybind11/pybind11.h>
namespace py = pybind11;
#include <utils/datatype.h>

PYBIND11_MODULE(py_ltie, m) {
    py::class_<xyz>(m, "xyz")
        .def(py::init<>())
        .def(py::init<double, double, double>())
        .def("to_llh_wgs84", py::overload_cast<>(&xyz::to_llh))
        .def("to_llh", py::overload_cast<double, double>(&xyz::to_llh))
        /*其他成员变量 或成员函数*/
        .def("cross",&xyz::cross);
}
通过py::overload_cast<..>(..),
将不需要入参、默认使用WGS84椭球参数的函数to_llh在python的调用方法,修改为"to_llh_wgs84",
将需要输入椭球长短半轴的函数to_llh在python中的调用方法,修改为"to_llh"
operator
1 加减乘除双目运算符
仍以类中提到的xyz为例,类里包含了加减乘除运算符,实现方法为,
/// your_libs.cpp
#include <pybind11/pybind11.h>
namespace py = pybind11;
#include <utils/datatype.h>

PYBIND11_MODULE(py_ltie, m) {
    py::class_<xyz>(m, "xyz")
        .def(py::init<>())
        .def(py::init<double, double, double>())
        .def("__add__", &xyz::operator+)
        .def("__sub__", &xyz::operator-)
        .def("__mul__", &xyz::operator*)
        .def("__truediv__", &xyz::operator/)
        /*其他成员变量 或成员函数*/
        .def("cross",&xyz::cross);
}
2 bool隐式转换
另一个类funcrst,是执行函数返回的信息,记可隐式转换为bool值, 直接使用if判断是否执行成功
struct funcrst{
    funcrst() { result = false; explain = ""; };
    funcrst(bool b, std::string s) { result = b; explain = s; }
    bool result{ false };
    std::string explain{ "" };
    operator bool() { return result; }
};
语法为,
/// your_libs.cpp
#include <pybind11/pybind11.h>
namespace py = pybind11;
#include <utils/datatype.h>

PYBIND11_MODULE(py_ltie, m) {
    py::class_<xyz>(m, "xyz")
        /* ... */
        .def(py::init<>());

    py::class_<funcrst>(m, "funcrst")
        .def(py::init<>())
        .def(py::init<bool, std::string>())
        .def_readwrite("result",&funcrst::result)
        .def_readwrite("explain",&funcrst::explain)
        .def("__bool__", &funcrst::operator bool);
}
枚举
c++中的(强)枚举,
enum class Look_Diredction { error, left, right };
转到pybind11,
/// your_libs.cpp
#include <pybind11/pybind11.h>
namespace py = pybind11;
#include <utils/datatype.h>
#include <algo/datatype.h>

PYBIND11_MODULE(py_ltie, m) {
    py::class_<xyz>(m, "xyz")
        /* ... */
        .def(py::init<>());

    py::class_<funcrst>(m, "funcrst")
        /* ... */
        .def(py::init<>());

    py::enum_<Look_Diredction>(m, "look_direction")
        .value("error", Look_Diredction::error)
        .value("left", Look_Diredction::left)
        .value("right", Look_Diredction::right)
        .export_values();
}
模板类
以pt2<>为例, 是一个存放和计算像平面坐标的模板类,
/// include/utils/datatype.h
template<typename type>
class pt2
{
    static_assert(std::is_same<type, int>::value || std::is_same<type, double>::value
                  , "Type must be short int, or double.");
public:
    pt2() :c(0), r(0) {};
    pt2(type row_, type col_) :c(col_), r(row_) {};

    type norm() { ...};
    pt2<type> abs_() { ... };
    pt2<type> unit() { ...};

    bool operator !=(pt2<type> src) {return !operator==(src);};
    bool operator ==(const pt2<type> src) {...};
    pt2<type> operator-(pt2<type> src) {...};
    pt2<type> operator+(pt2<type> src) {...};
    pt2<type> operator/(const type m) {...};
    pt2<type> operator*(const type m) {...};

    template<typename _Ty2>
    pt2<_Ty2> to() {
        return pt2<_Ty2>(this->r, this->c);
    }

public:
    type r; /// @brief equal with 'y' & 'row'
    type c; /// @brief equal with 'x' & 'col'
};
我们需要在python中提供pt2<int>和p2<double>的数据接口,那么需要在your_libs.cpp中定义一个模板函数"特化"的函数。
template <typename T>
void template_pt2(py::module& m, const std::string& className) {
    py::class_<pt2<T>>(m, className.c_str())
        .def(py::init<>())
        .def(py::init<T, T>())
        .def("norm",&pt2<T>::norm)
        .def("abs",&pt2<T>::abs_)
        .def("unit",&pt2<T>::unit)
        .def("__add__", &pt2<T>::operator+)
        .def("__sub__", &pt2<T>::operator-)
        .def("__mul__", &pt2<T>::operator*)
        .def("__truediv__", &pt2<T>::operator/)
        .def_readwrite("r", &pt2<T>::r)
        .def_readwrite("c", &pt2<T>::c);
}

PYBIND11_MODULE(py_ltie, m) {
    /* 其他定义 */
    template_pt2<int>(m, "pt2i");
    template_pt2<double>(m, "pt2d");
}
TODO
派生类, 静态变量等... 以后有机会接触到了再完善相关内容
pyd使用
完成上述内容后, 通过编译可以得到几个文件
- py_ltie.cp310-win_amd64.pyd
- py_ltie.exp
- py_ltie.lib
- python310.dll
(因为我链接的python版本是310, C++编译器是amd64版, 所以得到的pyd文件的后缀是“cp310-win_amd64.pyd”)
将这些文件与my_utils.dll, my_algo.dll依赖的三方动态库,放到同一目录下(最好可以被python检索到)
比如,这py_ltie依赖my_utils.dll, my_algo.dll,而俩动态库又依赖gdal, fmt, tinyxml2, nlohoman_json, fftw等动态库。但通常在编译my_utils.dll和 my_algo.dll时,系统就已经配好环境了。
我将它们(pyd, mu_utils.dll, my_algo.dll, gdal.dll, libtiff.dll, ...)打包放到d:/python310/Lib/site-packages/ltie/地址内。(ltie是该工程的命名缩写)
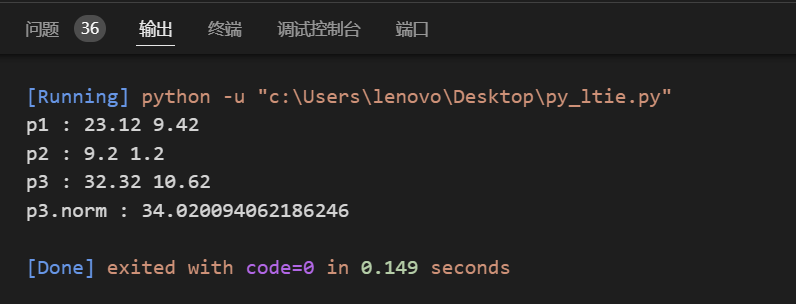
任意位置创建一个.py文件, 写入
from ltie.py_ltie import pt2d

p1 = pt2d(23.12, 9.42)
p2 = pt2i(9.2, 1.2)
p3 = p1 + p2
print("p1 :", p1.r, p1.c)
print("p2 :", p2.r, p2.c)
print("p3 :", p3.r, p3.c)
print("p3.norm :", p3.norm())
from ltie.py_ltie import pt2i中,
ltie是site-packages下的文件夹"ltie"py_ltie是我们生成的pyd文件,pt2i是py_ltie中的一个特化模板类
执行python脚本, 得到结果如下所示
pybind11-stubgen
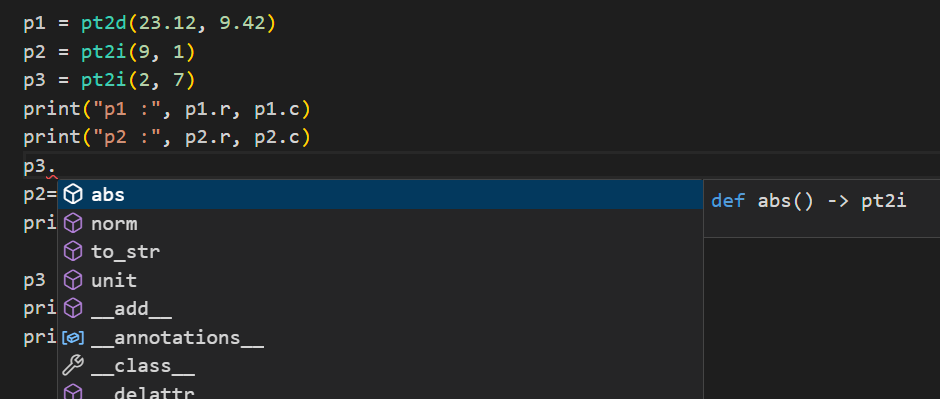
生成pyd文件后, 我们已经可以基于它编写python脚本, 但没有智能提示会导致非常容易写错代码, 所以我们需要借助pybind11-stubgen工具来制作与pyd文件相对应的pyi文件,使IDE的智能提示功能正常工作。
安装
pip install pybind11-stubgen
输入pybind11-stubgen -v可以查看是否安装成功。
在保证pyd文件可以被python工具检索到后, 输入pybind11-stubgen.exe py_ltie, 如果没有快速报错, 一般就是输出成功了
结束后会在当前地址(比如我所使用设备的powershell的默认地址是c:/user/lenovo)创建一个stubs文件夹, 里面有一个ltie文件夹, 里面存放这一个py_ltie.pyi
将pyi文件拷贝至site-packages/ltie/后, 再次使用VSCode写代码时, 就出现了智能提示。